Proper bonding of coatings and linings to a blasted steel substrate requires several conditions to ensure expected performance.
Prior to painting, the steel should be:
• Free of rust and mill scale
• Prepared with a surface profile that promotes optimal performance
• At the specified environmental conditions
• Free of surface contaminants like salts, dust, oils, and grease.
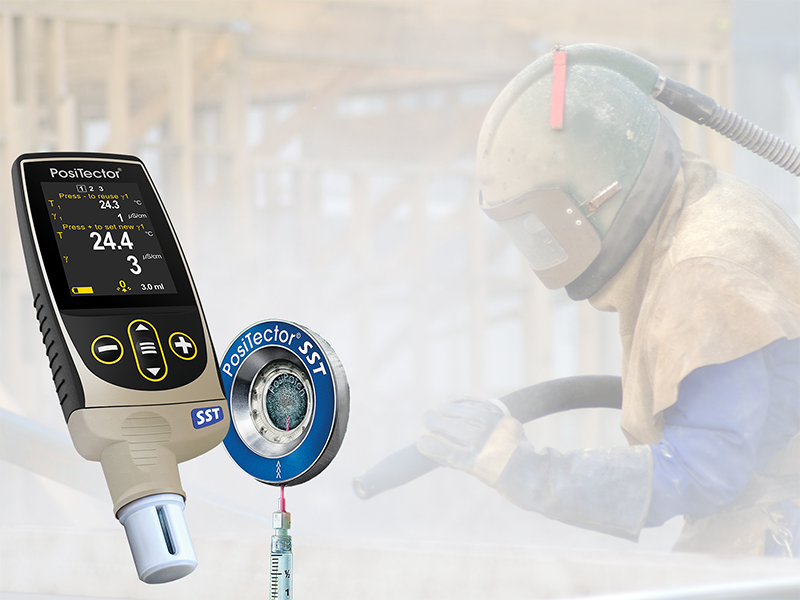
DeFelsko offers several instruments to assess these requirements, such as the PosiTector RTR H Replica Tape Reader or PosiTector SPG Surface Profile Gauge, PosiTector DPM Dew Point Meter, PosiTector SST Soluble Salt Tester, and the PosiTest DT Dust Tape Test.
This article will focus on the Dust Tape Test, as performed in compliance with ISO 8502-3, “…Assessment of dust on steel surfaces prepared for painting (pressure-sensitive tape method)”. Consult and follow the applicable standard prior to testing.
The Dust Tape Test is a test procedure used to assess the quantity and size of dust on steel surfaces before they are painted. This dust typically consists of remnants of the blast media used, and deposits from the environment and atmosphere.
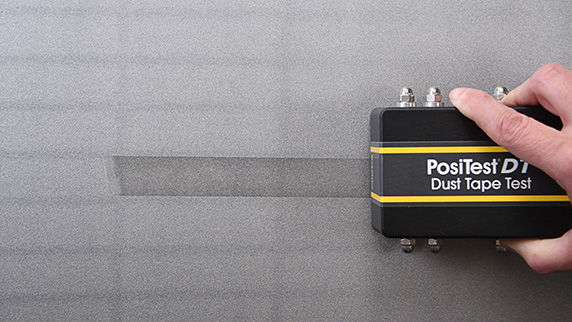
The Dust Tape Test is performed by pressing a length of a specified tape onto the blasted surface. A prescribed amount of pressure is applied, the tape is removed, and the tape is visually assessed for the size and quantity of the dust particles against pictorial references found in the standard (ISO 8502-3).
A numerical grade is determined by selecting the pictorial reference/s that most closely match the size and quantity of dust particles adhered to the tape. The test method may also be used as a “pass/fail” test (by comparing the dust on the tape to the provided references). Typically, a permanent record of the dust present on a surface is retained by placing the dust-contaminated tape onto a Dust Test Report Form.
Per ISO 8502-3, “The performance of protective coatings of paint and related products applied to steel is significantly affected by the state of the steel surface immediately prior to painting.” Since contaminants such as dust can cause a coating system failure in the way of inadequate adhesion, it has become necessary to determine the rating of dust contamination on blasted steel surfaces.
The Dust Tape Test provides a basis for rating the dust contamination of the blasted steel surface to determine if remedial steps, such as those defined by ISO 8504-2—“Preparation of steel substrates before application of paints and related products — Surface preparation methods — Part 2: Abrasive blast-cleaning”, should be taken.
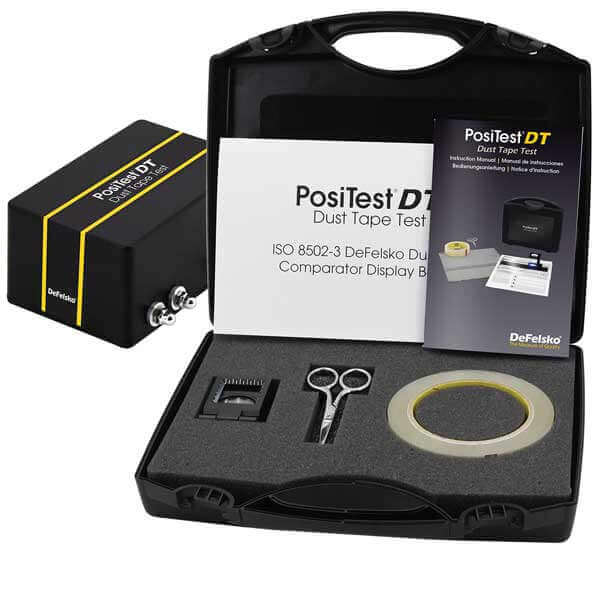
ISO 8502-3 details several items required and recommended to perform the Dust Tape Test. The DeFelsko PosiTest® DT Dust Tape Test kit comes complete with everything needed to perform the assessment, including:
• 1 Roll of ISO 8502-3 Tape—25 mm wide
• Scissors
• Illuminated 10x Magnifier (with batteries)
• Dust Test Comparator
• Transparent Display Boards
• 25 pack of Report Forms
• Multi-language Instruction Manual
• Hard Shell Plastic Case with custom foam insert
The PosiTest DT Dust Tape Roller is an optional accessory used for applying force in accordance with ISO 8502-3 and features a calibrated roller capable of applying a load of 39.2 N–49.0 N.
PosiTest DT Dust Tape Kit Product Literature
Notes:
• These instructions provide brief summaries of procedures used to perform the Dust Tape Test. Consult and follow the ISO 8502-3 test method prior to testing.
• Suitable for steel surface graded A, B, or C, as defined by ISO 8501-1
Step 1: Before beginning each series of tests, remove the first three turns of tape from the roll and discard. Remove a piece of tape approximately 20 cm (or 8 in) long from the roll. To avoid contamination, only touch the adhesive side of the tape at the far ends.
[IMAGE CONTAINING (ON LEFT) TAPE BEING PEELED, (ON RIGHT) CUT PIECE BEING HELD PROPERLY]
Step 2: Press approximately 15 cm (or 6 in) of the freshly exposed tape onto the surface using either a thumb or the optional PosiTest DT Tape Roller. Apply firm pressure and a constant speed to press the tape onto the surface, three times in each direction. Each stroke should take between 5 and 6 seconds. If using the PosiTest DT Roller, keep the tape centered between the yellow stripes on the roller.
[IMAGE CONTAINING PICTURES OF BOTH APPLICATION METHODS (TAPE AND THUMB)]
Step 3: Remove the tape from the steel surface and press it onto the Transparent Display Board using a thumb. Try to remove all of the trapped air bubbles from the tape before visually inspecting the tape.
[IMAGE OF TAPE BEING PLACED ON THE TRANSPARENT DISPLAY BOARD]
Step 4: To assess the quantity and size of dust particles, place the Transparent Display Board over the Black, White, or Two-toned strip on the Dust Test Comparator, whichever strip provides the most contrast.
[IMAGE OF TAPE + TRANSPARENT BOARD OVERLAID ON THE COMPARATOR]
Visually assess the size of dust particles and classify them using the Descriptions of Dust Particles table shown on the Dust Test Comparator. If necessary, use the included 10x magnifier to evaluate small dust particles. Record the Dust Size Class, 0–5.
[IMAGE OF INSPECTOR LOOKING THROUGH THE MAGNIFIER (ON LEFT) AND A CLOSEUP OF THE MAGNIFIER + COMPARATOR (ON RIGHT)]
Next, visually assess the quantity of dust particles by comparing with an equivalent-sized area of the 5 Dust Quantity Rating pictorial references shown on the Dust Tape Comparator. Record the corresponding rating that is the closest match. The use of intermediate half-steps is permissible to give a more detailed report.
[IMAGE OF INSPECTOR LOOKING AT THE QUANTITY PORTION OF COMPARTOR WITH TRANSPARENCY]
Note: It is not unusual after carrying out the test to find that the tape displays an overall discoloration, usually reddish brown or black, sometimes with the presence of discreet visible particles—depending on the type of abrasive used when blast cleaning. Report any overall discoloration of the tape as quantity rating 5, dust size class 1. This discoloration is caused by microscopic dust from the test surface that can cause serious interference with paint adhesion.
A sufficient number of tests must be performed to adequately characterize the surface. For every surface type, perform at least 3 separate tests. If the results differ by more than 1, perform at least two additional tests and average the results of all 5 tests.
Step 5: To Record the Results, remove the tape from the Transparent Display Board and place it on the provided Dust Test Kit Report Form. Under “Dust Quantity Rating” record the number of the pictorial reference which most closely corresponds to each Test Sample AND under the “Dust Size Class” record the dust particle size using the Description of Dust Particles shown on the Dust Test Comparator.
[IMAGE OF A COMPLETED REPORT WITH INDICATORS]
Blasted steel contaminated by dust reduces the adhesion of a coating system. Assessing the level of dust contamination in accordance with ISO 8502-3 and subsequently remediating it (if necessary) can greatly increase the effectiveness and longevity of protective coatings.
The PosiTest DT Dust Tape Test is ideal for quantifying the amount of dust present on blast cleaned surfaces. To learn more about the PosiTest DT, visit DeFelsko.com/DT or click the image below to view the product literature.