DeFelsko Corporation
Date Published: 11/01/2023
The bond strength between a coating and its substrate is critical for the coating systems performance. There are many ways to assess this adhesion strength including quantitative methods such as those performed with mechanical “Pull-off Testers” like the PosiTest® AT-A and PosiTest® AT-M (ASTM D4541/ISO 4624).
Qualitative methods include tests such as the “Knife Test” (ASTM D6677), “X-Cut Tape Test” (ASTM D3359 method A), and the “Cross Hatch (Cross Cut) Adhesion Test” (ISO 2409, ASTM D3359 method B). These qualitative methods are generally fast, low-cost alternatives that rely on subjective rating systems to describe a coatings adhesion strength properties.
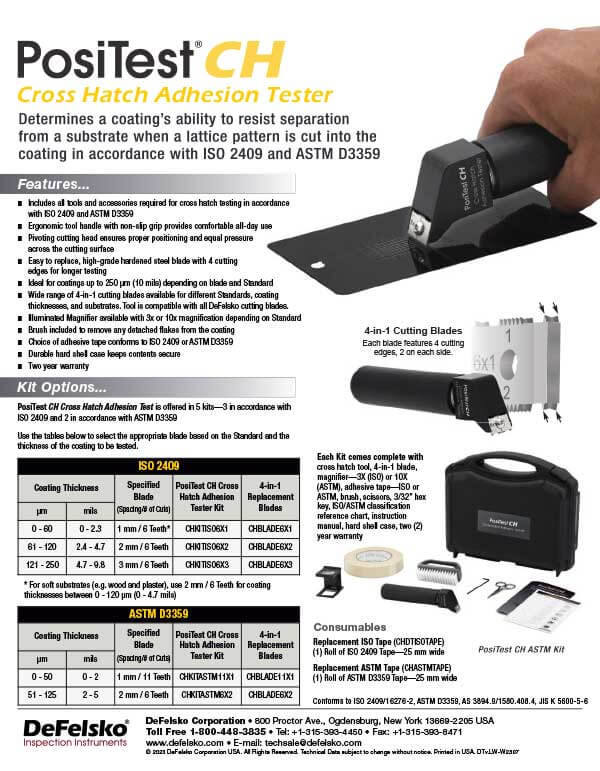
This article will detail the Cross Hatch Adhesion Test method in accordance with ASTM D3359 method B using the PosiTest® CH Cross Hatch Adhesion Test kit.
[To learn learn how to perform a Cross Hatch Adhesion Test in accordance with ISO 2409, see “How to Perform a Cross Hatch Adhesion Test in Accordance with ISO 2409”.]
The cross hatch (cross cut) adhesion test, as defined by standards ASTM D3359 and ISO 2409, is a popular means of testing the ability of a coating to resist separation from a substrate. ASTM D3359 recommends the cross hatch test for coatings up to 125 μm or 5 mils.
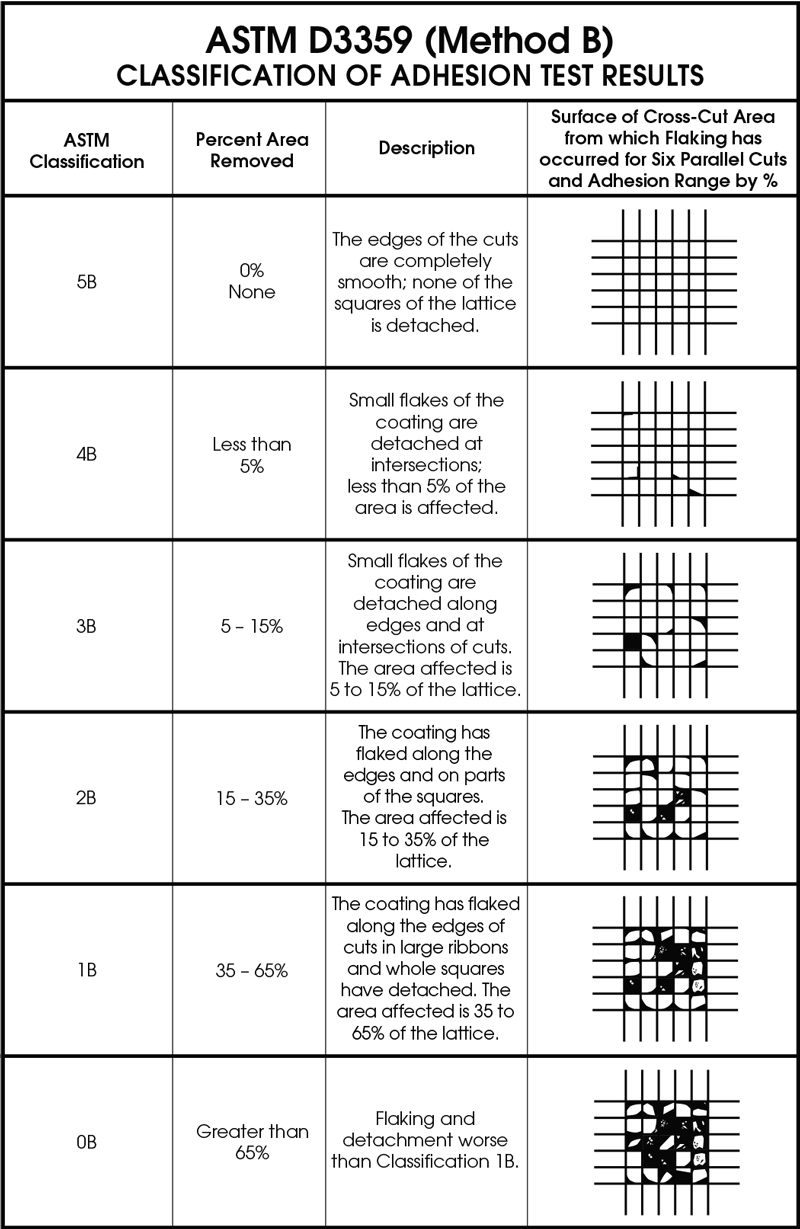
Using a cross-hatch cutter, a lattice pattern is cut through the film to the substrate. The test area is then brushed to remove any loose film finish particles. A special tape is then firmly applied over the cross-hatch test area and removed quickly by pulling the tape back off to reveal the amount of coating lifted off by the test tape. The lattice pattern is then visually compared to diagrams in the ASTM D3359 standard and given a rating on a scale of 0B–5B.
For coatings to perform satisfactorily, they must adhere to the substrates to which they are applied. Testing the adhesion of paint after cure can be determinative of the coating systems longevity. While there are a variety of recognized test methods that can be used to determine how well a coating is bonded to the substrate, the cross hatch adhesion test has several benefits:
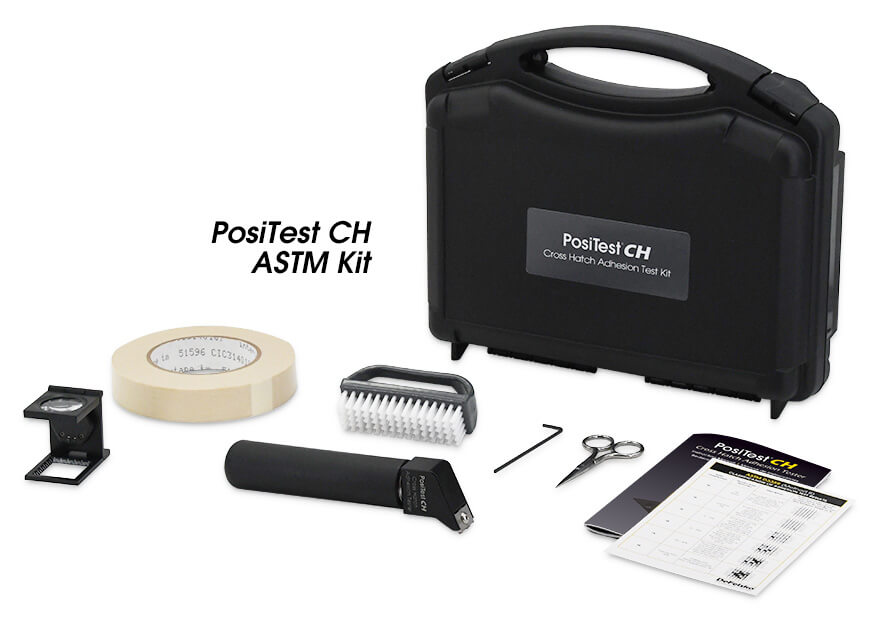
ASTM D3359 method B mentions several items required for performing the cross hatch adhesion test. PosiTest CH Cross Hatch Adhesion Test Kits include everything needed to perform the adhesion test, including:
Note: Instructions provide brief summaries of procedures used to perform the cross hatch adhesion test. Consult and follow the ASTM D3359 (method B) test method prior to testing
The test specimens should be prepared as detailed in the standard. ASTM D3359 recommends several best practices for proper surface preparation (ASTM D609, D1730, D2092, and D823).
For hard panels, the minimum thickness is 0.25 mm (0.01”). For relatively soft panels such as wood, the minimum thickness is 10 mm (0.4”).
Conduct the test at room temperature unless otherwise agreed.
The test area should be flat and free of blemishes and other surface imperfections.
To determine the correct cutting blade, measure the sample’s dry film thickness using a coating thickness gage such as the PosiTector 6000, PosiTector 200, or PosiTest DFT.
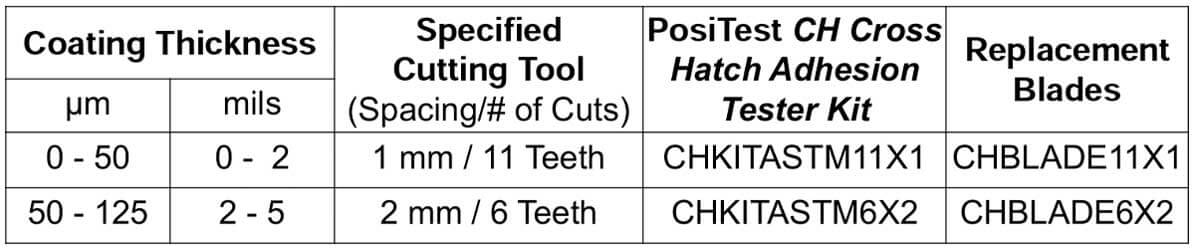
Step 1: Ensure that the correct cutting blade is installed in the cutting tool, according to the dry film thickness (DFT) of the coating. For coating thickness of 0 to 50 µm (0 to 2 mils), use the 1 mm/11 teeth blade. For a coating thickness of 50 to 125 µm (2 to 5 mils), use the 2 mm/6 teeth blade.
Step 2: The cutting blade should be inspected before each use for signs of wear or damage. If the cutting edge is damaged or dulled, a new cutting edge should be used.
If using the PosiTest CH cutting tool with the 4-in-1 replacement blades, simply rotate or flip the blade. Refer to the instruction manual for further information.

Step 3: With the test panel on a rigid, flat surface, place the PosiTest CH on the coated surface with the blade perpendicular to the coating, and pull the tool across the surface to create a mark or scratch approximately 20 mm (¾ in) long. After cutting, lightly brush the surface with the included brush to remove any detached flakes of coating.
[Image of cut #1 + brushing]
Step 4: Repeat step 3, producing another set of cuts at a 90° angle and centered to the first set of cuts, creating a lattice pattern on the surface. Lightly brush the surface to remove any debris.
[Image of cut #2]
Note: All cuts shall mark or scratch the substrate or the test is considered invalid and should be repeated in a new area. Use the included illuminated magnifier to verify that light is reflecting off of the metal substrate.
[Image of magnifier + cuts]
Step 5: Carefully cut a piece of pressure-sensitive tape, approximately 75 mm (3 in) long, from the roll.
[Image of a piece of tape cut to the proper length]
Note: At the beginning of each work day, remove two complete turns of tape from the roll and discard.
Step 6: Place a piece of pressure-sensitive tape over the center of the lattice cut and press the tape in place with a finger. Firmly rub the surface using a pressure application device, or a suitable alternative, such as a rubber eraser or rubber roller until the tape’s color is uniform in appearance.
Note: A uniform tape color indicates good contact to the test surface.
[Image of a piece of tape over the lattice cut & smoothed half way to show proper application]
Step 7: Remove the tape by holding the free end and quickly pulling it back over itself at an angle as close to 0° as possible. The test should be completed within one to two minutes of cutting the lattice.
[Image of the tape being pulled back at 0°]
Step 8: Visually inspect the cut area, with or without the included 10x Magnifier, and classify the results according to the description and illustrations in ASTM D3359 Classification of Adhesion Test Results Chart.
Reporting requirements for ASTM D3359 method B include:
The cross hatch adhesion test is an easy, inexpensive method of quickly assessing the bond strength of coatings to a substrate. The PosiTest CH Cross Hatch Adhesion Tester kit with the ergonomically designed cutter and 4-in-1 replaceable blades is ideal for determining the adhesion strength of coatings.
To learn more about the PosiTest CH visit DeFelsko.com/CH or click the image below to view the product literature.